Amazon Today's Deals


Breaking News

MAS Infotech

Tamil Blog - InfoMAS

Ads

Showing posts with label Software. Show all posts

Tuesday, 17 May 2016

Best GIF maker app for Android (FREE)

Zooface – GIF Animal Morph (FREE)

Zooface - GIF Animal Morph app for android
8.2/10This one is a bit different and funny. Remember the characters on Twilight Saga, those shape-shifting into giant wolves? Zooface will let you do so right on android. Just select a face and an animal, the app will automatically morph the person into animal.
Read more ...

Tuesday, 15 March 2016

5 Best Free Download Manager Applications for Android

Are you tired of the slow browser downloading and looking for a better way to download files on your Android device? Well, then download manager is the best solution for you.
Download manager is a program designed to ease the process of downloading files. It accelerates downloads by splitting files into multiple sections and downloading them simultaneously, and therefore speed up the download process. Additionally, it can also resume broken downloads so you don’t have to start downloading from the beginning. Although web browsers may have built-in download manager, but they do not speed things up the way download managers do.
There are numerous download manager apps available on Google play store that you can use to ease your downloading work. The following are some of the best free download manager apps for Android.
  1. Advanced Download Manager
    Advanced Download Manager is one of the powerful download manager app made for Android platform. This app lets you download files in three different parts and each part provides certain set download speed. You can easily choose the maximum download speed for each part.Furthermore, if the data connection is lost during download, the program will resume it automatically when the connection is back.
    ADM has a build in web browser with. If the download link isn’t a direct link, then this free app automatically opens its build in web browser to get the fresh link. It supports browsers like Stock Browser, Chorme, Dolphin, and Boat Browser.
    All files will be saved according to types in different folder. You can even select the download links and add them to the app to download it later at any point of time.
    Other Features of Advanced Download Manager:
    • Accelerate download speed by using multithreading.
    • Backup downloaded files on SD card.
    • Widget on your home screen.
    • Completion notification by sound and vibration.
  2. advanced download manager screenshots
  3.  Loader Droid Download Manager
    Loader Droid is another great download manager developed for Android. It supports any type of downloads, like apps, images, music, videos, etc.Like ADM, this app also divides the downloads into 3 different parts which accelerates the overall download speed. Also, all the downloads are resumable. You can easily resume the interrupted or paused download.
    The good thing about it is that it will pause automatically when connection lost and automatically starts the download when connection comes back.
    Other feature of Loader Droid Download Manager:
    • Recognize links in the browser automatically.
    • Schedule downloads.
    • Dark and Light theme for your preference.
  4. loader droid download manager screenshots
  5. Turbo Download Manager
    Turbo download manager is a fast Android download manager that can boost your download speed up to 5 times. The app uses multiple HTTP connections to accelerate download speed. To increase download speed you can increase maximum connections per download. Also, you can modify the buffer size from the settings menu of the app to optimize the download speed.Like other download manager apps, Turbo Download Manager also provides the ability to resume interrupted download.
    To use this app, you should long press the link in the browser and choose Share link -> Turbo download manager to start downloading files.
    Other features of Turbo Download manager:
    • Unlimited file size supported.
    • Background progress.
    • Sound notifications of download completion.
    • Download history.
    • Configure download directory settings.
  6. turbo download manager screenshots
  7. Download Manager for Android
    Download manager is another best download manager for Android that lets you manage all downloads from one location. It has a clean and simple user interface with a lot of features.Download manager for Android allows you to downloads files in parallel parts reusing connection to increase download speed. It also has resume capacities, and supports large file downloads of up to 2GB.
    Downloads can also be initiated right from the browsers or by entering the download URL into the app directly.
    Other features of Download Manager for Android:
    • Three times faster download speed.
    • Voice and speech quick search.
    • Download webpage history suggestion.
    • Support Google, Yahoo, YouTube, Twitter search.
    • Resume, cancel, and pause any download progress.
  8. download manager for android screenshots
  9. Easy Downloader Pro
    Easy Downloader Pro is the effective download manager app for Android device. If you have problem while downloading multiple files simultaneously from internet on your mobile phone than Easy Downloader Pro is the best choice for you. This app allows you to download up to 10 different files at the same time.It can not only enable you download large files in different formats easily, but also help you organize all the files in order. Any kind of file formats can be downloaded using this app.
    Like the TDM, you can download files directly from browsers through Share Link or by copying/pasting the link directly into the app. It supports Firefox, Boat Browser, Dolphin browser, etc.
    Other features of Easy Downloader Pro:
    • Multiple protocols supported so multiple files supported.
    • Download multiple files at the same time to speed up at least 50%.
    • Pause or resume downloads.
    • Be able to manage files in SD card.
    • Progress bar and notifications.
  10. easy downloader pro screenshots
So these are the top 5 free download manager for Android that you can download to speed up your download speeds. If you are using any other download manager apps, please feel free to share with us in the comments below.
Read more ...

Friday, 5 February 2016

30 Android Hidden Tips and Tricks; Works with Samsung, HTC, Motorola and Others


Android Secret Codes
Android Secret CodesIBTimes India
It is no trade secret now that Android is the #1 smartphone operating systems in the world. However, there are enough reasons behind this overnight success story.
Based on the Open Source software theory Android offers numerous flexibility and exclusive features which are yet to be seen in the rivals. For example, Android offers file transfer via Bluetooth, offers portable storage, allow install apps from anywhere, multi-tasking with split screen and many more which several rivals are yet to offer.

Apart from all these, Android also offers several secret codes, which can actually open a new world of smartphone computing for you. These codes are usually a sequence of numbers and symbols and meant to be entered through the usual phone dial pad which you usually use for inputting numbers before placing a call.
Following are the secret codes for you. Please read the subsequent result before trying them out, since a few codes are meant to wipe your entire system, pressing which you can lose your valuable data.
CodeDescription
*#*#4636#*#* Display information about Phone, Battery and Usage statistics
*#*#7780#*#* Resetting your phone to factory state-Only deletes application data and applications
*2767*3855# It's a complete wiping of your mobile also it reinstalls the phones firmware
*#*#34971539#*#* Shows completes information about the camera
*#*#7594#*#* Changing the power button behavior-Enables direct poweroff once the code enabled
*#*#273283*255*663282*#*#* For a quick backup to all your media files
*#*#197328640#*#* Enabling test mode for service activity
*#*#232339#*#* OR *#*#526#*#* Wireless Lan Tests
*#*#232338#*#* Displays Wi-Fi Mac-address
*#*#1472365#*#* For a quick GPS test
*#*#1575#*#* A Different type GPS test
*#*#0283#*#* Packet Loopback test
*#*#0*#*#* LCD display test
*#*#0673#*#* OR *#*#0289#*#* Audio test
*#*#0842#*#* Vibration and Backlight test
*#*#2663#*#* Displays touch-screen version
*#*#2664#*#* Touch-Screen test
*#*#0588#*#* Proximity sensor test
*#*#3264#*#* Ram version
*#*#232331#*#* Bluetooth test    
*#*#232337#*#* Displays bluetooth device address
*#*#8255#*#* For Google Talk service monitoring
*#*#4986*2650468#*#* PDA, Phone, Hardware, RF Call Date firmware info
*#*#1234#*#* PDA and Phone firmware info
*#*#1111#*#* FTA Software version
*#*#2222#*#* FTA Hardware verion
*#*#44336#*#* Displays Build time and change list number
*#06# Displsys IMEI number
*#*#8351#*#* Enables voice dialing logging mode
*#*#8350#*#* Disables voice dialing logging mode
Source: Reddit
Read more ...

Thursday, 7 May 2015

How to Unlock Micromax Phone after too many Failed Pattern Attempts


Normally we all Android users for the sake of our own privacy set up a lock on the Home screen so that any other person can’t bypass it to check our personal stuff. Pattern lock is the popular one and most of the users use this. We all come across a common problem forgetting or losing what pattern lock we had. Sometimes we are just stuck on lock screen. Then we need to unlock by putting our email address in , but sometimes you might forget your email or stuff. Today we will let you the way through which you can unlock your Micromax Android mobile after wrong pattern attempt. Micromax Phone Locked After too any Failure Pattern Attempt
In these cases you simply cannot unlock your device , today we are going to show you how to work on your device and unlock your device with/without losing data or any setting.

How to Unlock Micromax Phone Using Hard Reset

Using stock recovery and wipe data. This method will result In a full factory reset of your phone . How to do this?
  1. Switch off, Pull battery.
  2. Insert battery and Press and Hold Power+Volume up+Volume down together  (different phones might have a little different method of booting into recovery mode, but this is the most general one).
  3. You will then boot into recovery mode , use volume keys to navigate up and down and power key to choose.
  4. Choose Wipe DATA
  5. Choose wipe cache.
  6. Reboot device.
You are done and your lockscreen is gone and phone has been hard reset. Please not this leads to permanent removal of data.

Unlock Micromax Android Phone using Android Debug Bridge

In this we will use ADB (Android Debug Bridge) to unlock the device without losing any data.
  1. First we need to set up ADB on device , you generally need these files (LINK of adbzip) or you can Google on how to install ADB in windows.
  2. Just make a folder adb in c/root and copy the files.
  3. Install drivers of your phone (Use PDAnet if you have problem with finding drivers).
  4. Turn on USB debugging on phone. Follow : Setting–>Development–>USB Debugging (Turn On)
  5. Open Command prompt in computer , and type cd C:/Android (Android here is the folder where my adb files are , change according to yours)
  6. Then you can try following sets of command
Command set 1
method 1:
Code:
adb shell
cd /data/data/com.android.providers.settings/databases
sqlite3 settings.db
update system set value=0 where name=’lock_pattern_autolock';
update system set value=0 where name=’lockscreen.lockedoutpermanently';
.quit
Command set II
method 2:
Code:
adb shell rm /data/system/gesture.key

You have to try one method , and see which one is working.
This requires root in some devices and some it just works without problem.you can try both of them, here is how i managed to remove the lock:
1. Run the first method.
2 Reboot
3 Run the second method
4 Reboot

NOTE:
  • In the first method each line is a separate command so click enter after typing each line.
  • In the second method type all the command and then press enter.
  • After running both methods and rebooting you may see the pattern lock,that doesn’t necessarily mean it doesn’t work, just try any random pattern and it may unlock then remove the pattern from settings.
  • This may and may not work, it may work on some devices and don’t on others, so all you can do is trying it but i can’t assure it will work.
Source for second method : XDA
If you have any doubt you can drop a comment below.
Read more ...

Sunday, 12 April 2015

How To Sync Bookmarks Across Different Browsers Using Xmarks

Recently we talked about how you can import and export bookmarks from different browsers. This process, though simple and easy, is time consuming especially when you use more than one browser frequently.

The solution to this problem is Xmarks. This tool provides bookmarks synchronization across different browsers. You can easily sync all your bookmarks across Firefox, Internet Explorer, Google Chrome and Safari.  Xmarks stores all the bookmarks in the user account and those stored bookmarks are synchronized across browsers.
Bookmark synchronization means if you made a change in bookmarks on any one of browsers then it  appears on another browser too when you use the tool to sync it.
To sync your bookmarks between different browsers you need to install Xmarks extension in all the browsers you use. Xmarks provides add-ons for Firefox, Chrome, Internet Explorer and Safari.
Xmarks
In your Firefox browser go to Tools> Addons > Get Addons. Search for Xmarks, install it and restart your browser.  You can also directly go to the Xmarks add-on page and install it from there.
After restarting Firefox Go to tools> Xmarks option. Click on Next button and it will prompt you to Sign up page. Select “Create an account for me” option and click on Next button .
xmarks2
Now sign up to Xmarks by filling username, email address, password field and click on Next button.
xmarks bookmark sync
One of the most useful feature of Xmarks is it also provides password sync. You can enable secure password sync by selecting “Yes” option. Click on Next button.
Ads by Google
xmarks4
Now enter the PIN you get at the time of registration. For ensuring security don’t share this PIN with anyone.
xmarks5
Select the way you want to deal with the previous data of server and your computer. You can merge data on the server with data on your computer if you want your old bookmarks and passwords on your current computer.
xmarks6
Your data (bookmarks and Password) will start syncing. All the data on server will appear on your computer and vice versa. You will get notification of successful synchronization of bookmarks and password.
xmarks8
XMarks extension is also available for Google Chrome(Beta Version), Internet Explorer and Safari Browser. You can easily sync all your bookmarks on all the four browsers. The basic steps for syncing bookmark is similar for all the browsers.
If you are a Chrome user then you can install Chrome extension in beta version of Chrome.
chrome-sync
You can view all your bookmarks by logging into Xmarks website. You can also view and delete bookmarks, share these bookmarks with other users via email.
Go to Xmarks and install the corresponding extension for your browser.
Read more ...

Thursday, 26 March 2015

New Features in Android Lollipop

priority notifications

Lollipop wasn’t just a visual overhaul. It’s actually the biggest performance update to Android yet. Even on a year old mid-range device like Moto G, Lollipop runs smoothly. It also brought new features like lockscreen notifications, heads-up notifications, a guest mode, and more.
Notifications really got one of the biggest updates yet for Android. But while all the new features are great, notifications still might not be how you want them. Notifications are the most personal thing on the phone, so it makes sense that you should have total control over them. Thankfully, there are plenty of settings in Lollipop we can tweak to get there.

Interacting with Notifications on the Lockscreen

After you update to Lollipop, notifications will show up on the lockscreen by default. All of them. You can swipe left/right on the notification to dismiss it.
Unlock Screenshots
Double-tap on a notification to open it. Swipe up or down on the notifications to view all of them. And of course, swipe up to unlock the phone.

Hiding Sensitive Information from Notifications on Lockscreen

If you have notifications enabled for things like email, chat or WhatsApp, they will show up on the lockscreen, including a little preview of the message. This makes it easy for lurking eyes to read your messages.
You can disable notifications on the lockscreen completely by going to Settings -> Sound and notification -> When device is locked and choose Don’t show notifications at all.
No Notifications Notifications
But if you want to have your cake and eat it too, meaning let the notifications show up but without the content details, you’ll have to enable some kind of device unlock feature. It can be a pattern, pin, or even face unlock.
Notifications Notifications
After you’ve enabled the device lock, you’ll see a new option called hide sensitive notification content among the other two options.
This will still show the app’s name but to view the notification’s content you’ll have to unlock the phone.

Customize Heads Up Notifications

heads up lollipop
Heads up notifications in Lollipop are called priority interruptions. They come in when you have a call, a message or an event. Developers are also free to integrate priority notifications, so even apps like Facebook or WhatsApp could integrate it.
While priority notifications are toast, which means they will disappear after a couple of seconds, they can still be annoying.
To customize these notifications, go to Sound and notification -> Interruptions. Here you can select/deselect priority interruptions and even customize whose calls qualify for priority notifications.
2014-12-23 16.33.06 Notifications
No more toast: To disable heads up notifications completely, tap When calls and notifications arrive and select Don’t interrupt.
There’s also a setting to automate this process. Select set dates and times, like when you’re asleep and only priority notifications will come through.

Give Apps Priority in Notification Sorting

From Sound and notification go to App notifications and you’ll see a list of all the installed apps. Tap an app and you can assign it a higher priority in notification sorting.
Notifications
For example, if you do this for Gmail, its notification will always be on top even if ten more notifications have come after it.

Quickly Access Do Not Disturb Mode

When you use the volume buttons to change the ringer volume, you’ll get access to do not disturb settings right here. All doesn’t block any notifications. Priority only lets in priority notifications we set up above. And None blocks all notifications.
Notifications Notifications
Here you can specify time as well so the default status can resume automatically after say, 2 hours (range is from 15 minutes to 8 hours).

It Always Pays Off to Customize Notifications

If you play a lot of free games, you know how annoying notifications that keep bugging you to come back to the game can be. In times like these, it’s always good to do a notifications audit. Disable notifications from the apps you don’t need and enjoy some peace in life.
Which apps have you turned off notifications for? Let us know in the comments below.
Read more ...

How to Create Bootable Windows 8 USB Drive from ISO Image

windows-8-logoWe saw yesterday how you can install and test the latest Windows 8 build on your system as a virtual operating system using Oracle VirtualBox.
For those who haven’t heard, the consumer preview of Windows 8 is now available for everyone to test. It’s like what Microsoft did during Windows 7 launch. They first released a preview build for free to get feedback from the users before shipping the final version of the product. And the big news that the Windows 8 consumer preview has already crossed 1 million downloads.
After few hours of testing I was convinced that the build is stable enough, and I can take it to next level by installing it parallel to Windows 7 via dual boot. If you too are looking forward to install Windows 8 on your computer, I would prefer you create a bootable USB drive instead of a bootable DVD.
Note: This is a consumer preview of Windows 8 and not the final stable version. So keep in mind that you are always on your own if you mess up your computer while installing or using this Windows 8 build.
A USB drive is always faster than DVDs and the chances of failed or corrupt installation are very low as compared to optical media. So lets see how you can create the bootable USB of Windows 8 in the easiest way possible.

Necessary Prerequisites

  • Download the ISO file of Windows 8 on your system.
  • A minimum of 4 GB removable drive for 32-bit Windows and 8 GB for 64-bit Windows 8 operating system.
  • Backup all the data (if any) from your removable drive. Better, backup important data on your PC too.

Creating the Windows 8 Bootable USB Drive

Step 1: Download and extract WinUSB Maker on your computer. WinUSB maker is a portable application and thus does not require installation of any kind. You only need to run the .exe file.
Step 2: Run the WinUSB Maker tool with administrative privileges to start creating your bootable USB drive. (right-click on the file, and click Run as Administrator)
Step 3: In the tool, select the option ISO image bootable disk under the Functions  section. Select Normal Detection Mode and browse for the Windows 8 bootable ISO (Image file) you have already downloaded on your system.
USB maker
Step 4: Finally, select the USB drive and drive MBR system (if you have a single one plugged in, it will be selected by default, if you have more than one, click on the dropdown menu and make a selection from the list) and click on the button Make it Bootable .
warning
That’s all, the tool will now format the USB drive and copy all the Windows installation files to it and make it bootable.
bootable creation
You can now plug in the device into your system and select removable drive as your first boot selection preference in your BIOS and install Windows 8.

My Verdict

Although there’s an official Microsoft tool to create bootable USB drive from an ISO image, WinUSB maker’s portable nature and ease of use drew my attention. Furthermore, WinUSB gives a bit of an extra control to the user than the official tool for the same.
Read more ...

Saturday, 21 March 2015

How to Protect USB/Pendrive with Password

Here in this article we know about how to protect USB/pen drive with password and how can we give such protection with different types of software. Now a days every one use flash drives to transfer data from one computer to another computer because every flash drive is same in size but have capability of carrying GB’s of data. We use USB flash drives to boot into windows computer and play songs in DVD players. We also carry some important data through flash drives like office files and some other confidential information. Let’s assume if someone try to theft your pen drive, price is not a problem but data is more important.

So to prevent your important data from others you need to set some protection which is not easy to break. Here we provide some third-party applications which are good at protecting USB flash drives with password.

USB Security:

USB Security is a great software to protect your data which is located on USB flash drive. They provide better security to your pen drive which is not easy to get data from USB drive without entering password. This is a shareware application but it works well with all functions for 30 days. After that you need to buy full license to use application without any problem.

How to Use USB Security on USB Drive?

1. First you need to download latest version of USB security from the below website.
2. After that open USB security application and click on accept button to start installation. Once you click on accept button it will show all available removal drives in your pc.
3. Choose your USB drive from the list and click on install button, after that click on finish button to complete the installation.
install usb security on pen drive
4. Now you’ll see another window which have some sort options related to pen drive protection. It asks you to set new password to pen drive and again type the same password in next field. Type some hint to remember password when you forgot password.
protect usb drive with password
5. Make sure to check whether password in uppercase or lowercase. Once completing the setup click on protect button to protect data in pen drive.
6. Now it copies whole data into a secret partition and lock it with password. To get data from pen drive you need to run USBsecurity.exe file from USB flash drive and enter password to unlock pendrive.
usb drive protected

Some Common Problems and Solutions:

Q. How Can I get my Data Back if someone delete USBsecurity.exe?
A. There is no need to worry about this because it is a one minute process. Simply copy the USBsecurity.exe file and paste it into pen drive. Now again click on USBsecurity.exe and enter password to unlock pen drive.
Q. If I don’t have USBsecurity.exe file along with me then how can I get my data back?
A. Don’t worry, we have solution for that problem also. Simple go through the above download link and download USBsecurity.exe file then paste it into your pendrive. Now open that exe file to unlock your pendrive.
How to Uninstall USB Security.exe Completely from Your Pendrive?
Normal program uninstallation process doesn’t work with this application because it doesn’t install on PC, it installs on USB drive.
So before uninstalling this application you need to unprotect this application. After that it shows two options. Those are Uninstall and Reprotect.
Click on Uninstall button then it prompts another dialogue box with a message “Are you sure you want to uninstall USB Security”. Click on OK button to uninstall USB Security completely.
uninstall usb security

Is there any alternatives available for this software?

Yes there are some other applications are also available to protect pen drive with password. They are
1. Truecrypt
2. Rohos mini drive
3. Comodo Disk Encryption
4. USB Safeguard
5. Diskcryptor
By using these all tools you can protect your flash drive with password or encrypt whole data in the pendrive. If you have any doubts while installing this application please leave a message.
Read more ...

How to Protect USB/Pendrive with Password

Here in this article we know about how to protect USB/pen drive with password and how can we give such protection with different types of software. Now a days every one use flash drives to transfer data from one computer to another computer because every flash drive is same in size but have capability of carrying GB’s of data. We use USB flash drives to boot into windows computer and play songs in DVD players. We also carry some important data through flash drives like office files and some other confidential information. Let’s assume if someone try to theft your pen drive, price is not a problem but data is more important.

So to prevent your important data from others you need to set some protection which is not easy to break. Here we provide some third-party applications which are good at protecting USB flash drives with password.

USB Security:

USB Security is a great software to protect your data which is located on USB flash drive. They provide better security to your pen drive which is not easy to get data from USB drive without entering password. This is a shareware application but it works well with all functions for 30 days. After that you need to buy full license to use application without any problem.

How to Use USB Security on USB Drive?

1. First you need to download latest version of USB security from the below website.
2. After that open USB security application and click on accept button to start installation. Once you click on accept button it will show all available removal drives in your pc.
3. Choose your USB drive from the list and click on install button, after that click on finish button to complete the installation.
install usb security on pen drive
4. Now you’ll see another window which have some sort options related to pen drive protection. It asks you to set new password to pen drive and again type the same password in next field. Type some hint to remember password when you forgot password.
protect usb drive with password
5. Make sure to check whether password in uppercase or lowercase. Once completing the setup click on protect button to protect data in pen drive.
6. Now it copies whole data into a secret partition and lock it with password. To get data from pen drive you need to run USBsecurity.exe file from USB flash drive and enter password to unlock pendrive.
usb drive protected

Some Common Problems and Solutions:

Q. How Can I get my Data Back if someone delete USBsecurity.exe?
A. There is no need to worry about this because it is a one minute process. Simply copy the USBsecurity.exe file and paste it into pen drive. Now again click on USBsecurity.exe and enter password to unlock pen drive.
Q. If I don’t have USBsecurity.exe file along with me then how can I get my data back?
A. Don’t worry, we have solution for that problem also. Simple go through the above download link and download USBsecurity.exe file then paste it into your pendrive. Now open that exe file to unlock your pendrive.
How to Uninstall USB Security.exe Completely from Your Pendrive?
Normal program uninstallation process doesn’t work with this application because it doesn’t install on PC, it installs on USB drive.
So before uninstalling this application you need to unprotect this application. After that it shows two options. Those are Uninstall and Reprotect.
Click on Uninstall button then it prompts another dialogue box with a message “Are you sure you want to uninstall USB Security”. Click on OK button to uninstall USB Security completely.
uninstall usb security

Is there any alternatives available for this software?

Yes there are some other applications are also available to protect pen drive with password. They are
1. Truecrypt
2. Rohos mini drive
3. Comodo Disk Encryption
4. USB Safeguard
5. Diskcryptor
By using these all tools you can protect your flash drive with password or encrypt whole data in the pendrive. If you have any doubts while installing this application please leave a message.
Read more ...

How to Protect USB/Pendrive with Password

Here in this article we know about how to protect USB/pen drive with password and how can we give such protection with different types of software. Now a days every one use flash drives to transfer data from one computer to another computer because every flash drive is same in size but have capability of carrying GB’s of data. We use USB flash drives to boot into windows computer and play songs in DVD players. We also carry some important data through flash drives like office files and some other confidential information. Let’s assume if someone try to theft your pen drive, price is not a problem but data is more important.

So to prevent your important data from others you need to set some protection which is not easy to break. Here we provide some third-party applications which are good at protecting USB flash drives with password.

USB Security:

USB Security is a great software to protect your data which is located on USB flash drive. They provide better security to your pen drive which is not easy to get data from USB drive without entering password. This is a shareware application but it works well with all functions for 30 days. After that you need to buy full license to use application without any problem.

How to Use USB Security on USB Drive?

1. First you need to download latest version of USB security from the below website.
2. After that open USB security application and click on accept button to start installation. Once you click on accept button it will show all available removal drives in your pc.
3. Choose your USB drive from the list and click on install button, after that click on finish button to complete the installation.
install usb security on pen drive
4. Now you’ll see another window which have some sort options related to pen drive protection. It asks you to set new password to pen drive and again type the same password in next field. Type some hint to remember password when you forgot password.
protect usb drive with password
5. Make sure to check whether password in uppercase or lowercase. Once completing the setup click on protect button to protect data in pen drive.
6. Now it copies whole data into a secret partition and lock it with password. To get data from pen drive you need to run USBsecurity.exe file from USB flash drive and enter password to unlock pendrive.
usb drive protected

Some Common Problems and Solutions:

Q. How Can I get my Data Back if someone delete USBsecurity.exe?
A. There is no need to worry about this because it is a one minute process. Simply copy the USBsecurity.exe file and paste it into pen drive. Now again click on USBsecurity.exe and enter password to unlock pen drive.
Q. If I don’t have USBsecurity.exe file along with me then how can I get my data back?
A. Don’t worry, we have solution for that problem also. Simple go through the above download link and download USBsecurity.exe file then paste it into your pendrive. Now open that exe file to unlock your pendrive.
How to Uninstall USB Security.exe Completely from Your Pendrive?
Normal program uninstallation process doesn’t work with this application because it doesn’t install on PC, it installs on USB drive.
So before uninstalling this application you need to unprotect this application. After that it shows two options. Those are Uninstall and Reprotect.
Click on Uninstall button then it prompts another dialogue box with a message “Are you sure you want to uninstall USB Security”. Click on OK button to uninstall USB Security completely.
uninstall usb security

Is there any alternatives available for this software?

Yes there are some other applications are also available to protect pen drive with password. They are
1. Truecrypt
2. Rohos mini drive
3. Comodo Disk Encryption
4. USB Safeguard
5. Diskcryptor
By using these all tools you can protect your flash drive with password or encrypt whole data in the pendrive. If you have any doubts while installing this application please leave a message.
Read more ...

Saturday, 14 March 2015

WhatsApp Calling Goes Live For Everyone, Provided You Have A Recent App Version And Get "Invited" By Receiving A CallWhatsApp Calling Goes Live For Everyone, Provided You Have A Recent App Version And Get "Invited" By Receiving A Call

A few weeks ago, WhatsApp's Call feature made a small appearance for a few users, but at the time almost no one was able to trigger it reliably and keep it activated. The company appears to have flipped a few switches in its servers and the function is confirmed to work for those running version 2.11.528 from the Play Store, or 2.11.531 from WhatsApp's website (also uploaded to APKMirror).
whatsapp-calling-1 whatsapp-calling-3
CJ is happy to make a WhatsApp call. I assume that's why his image is so cheerful.
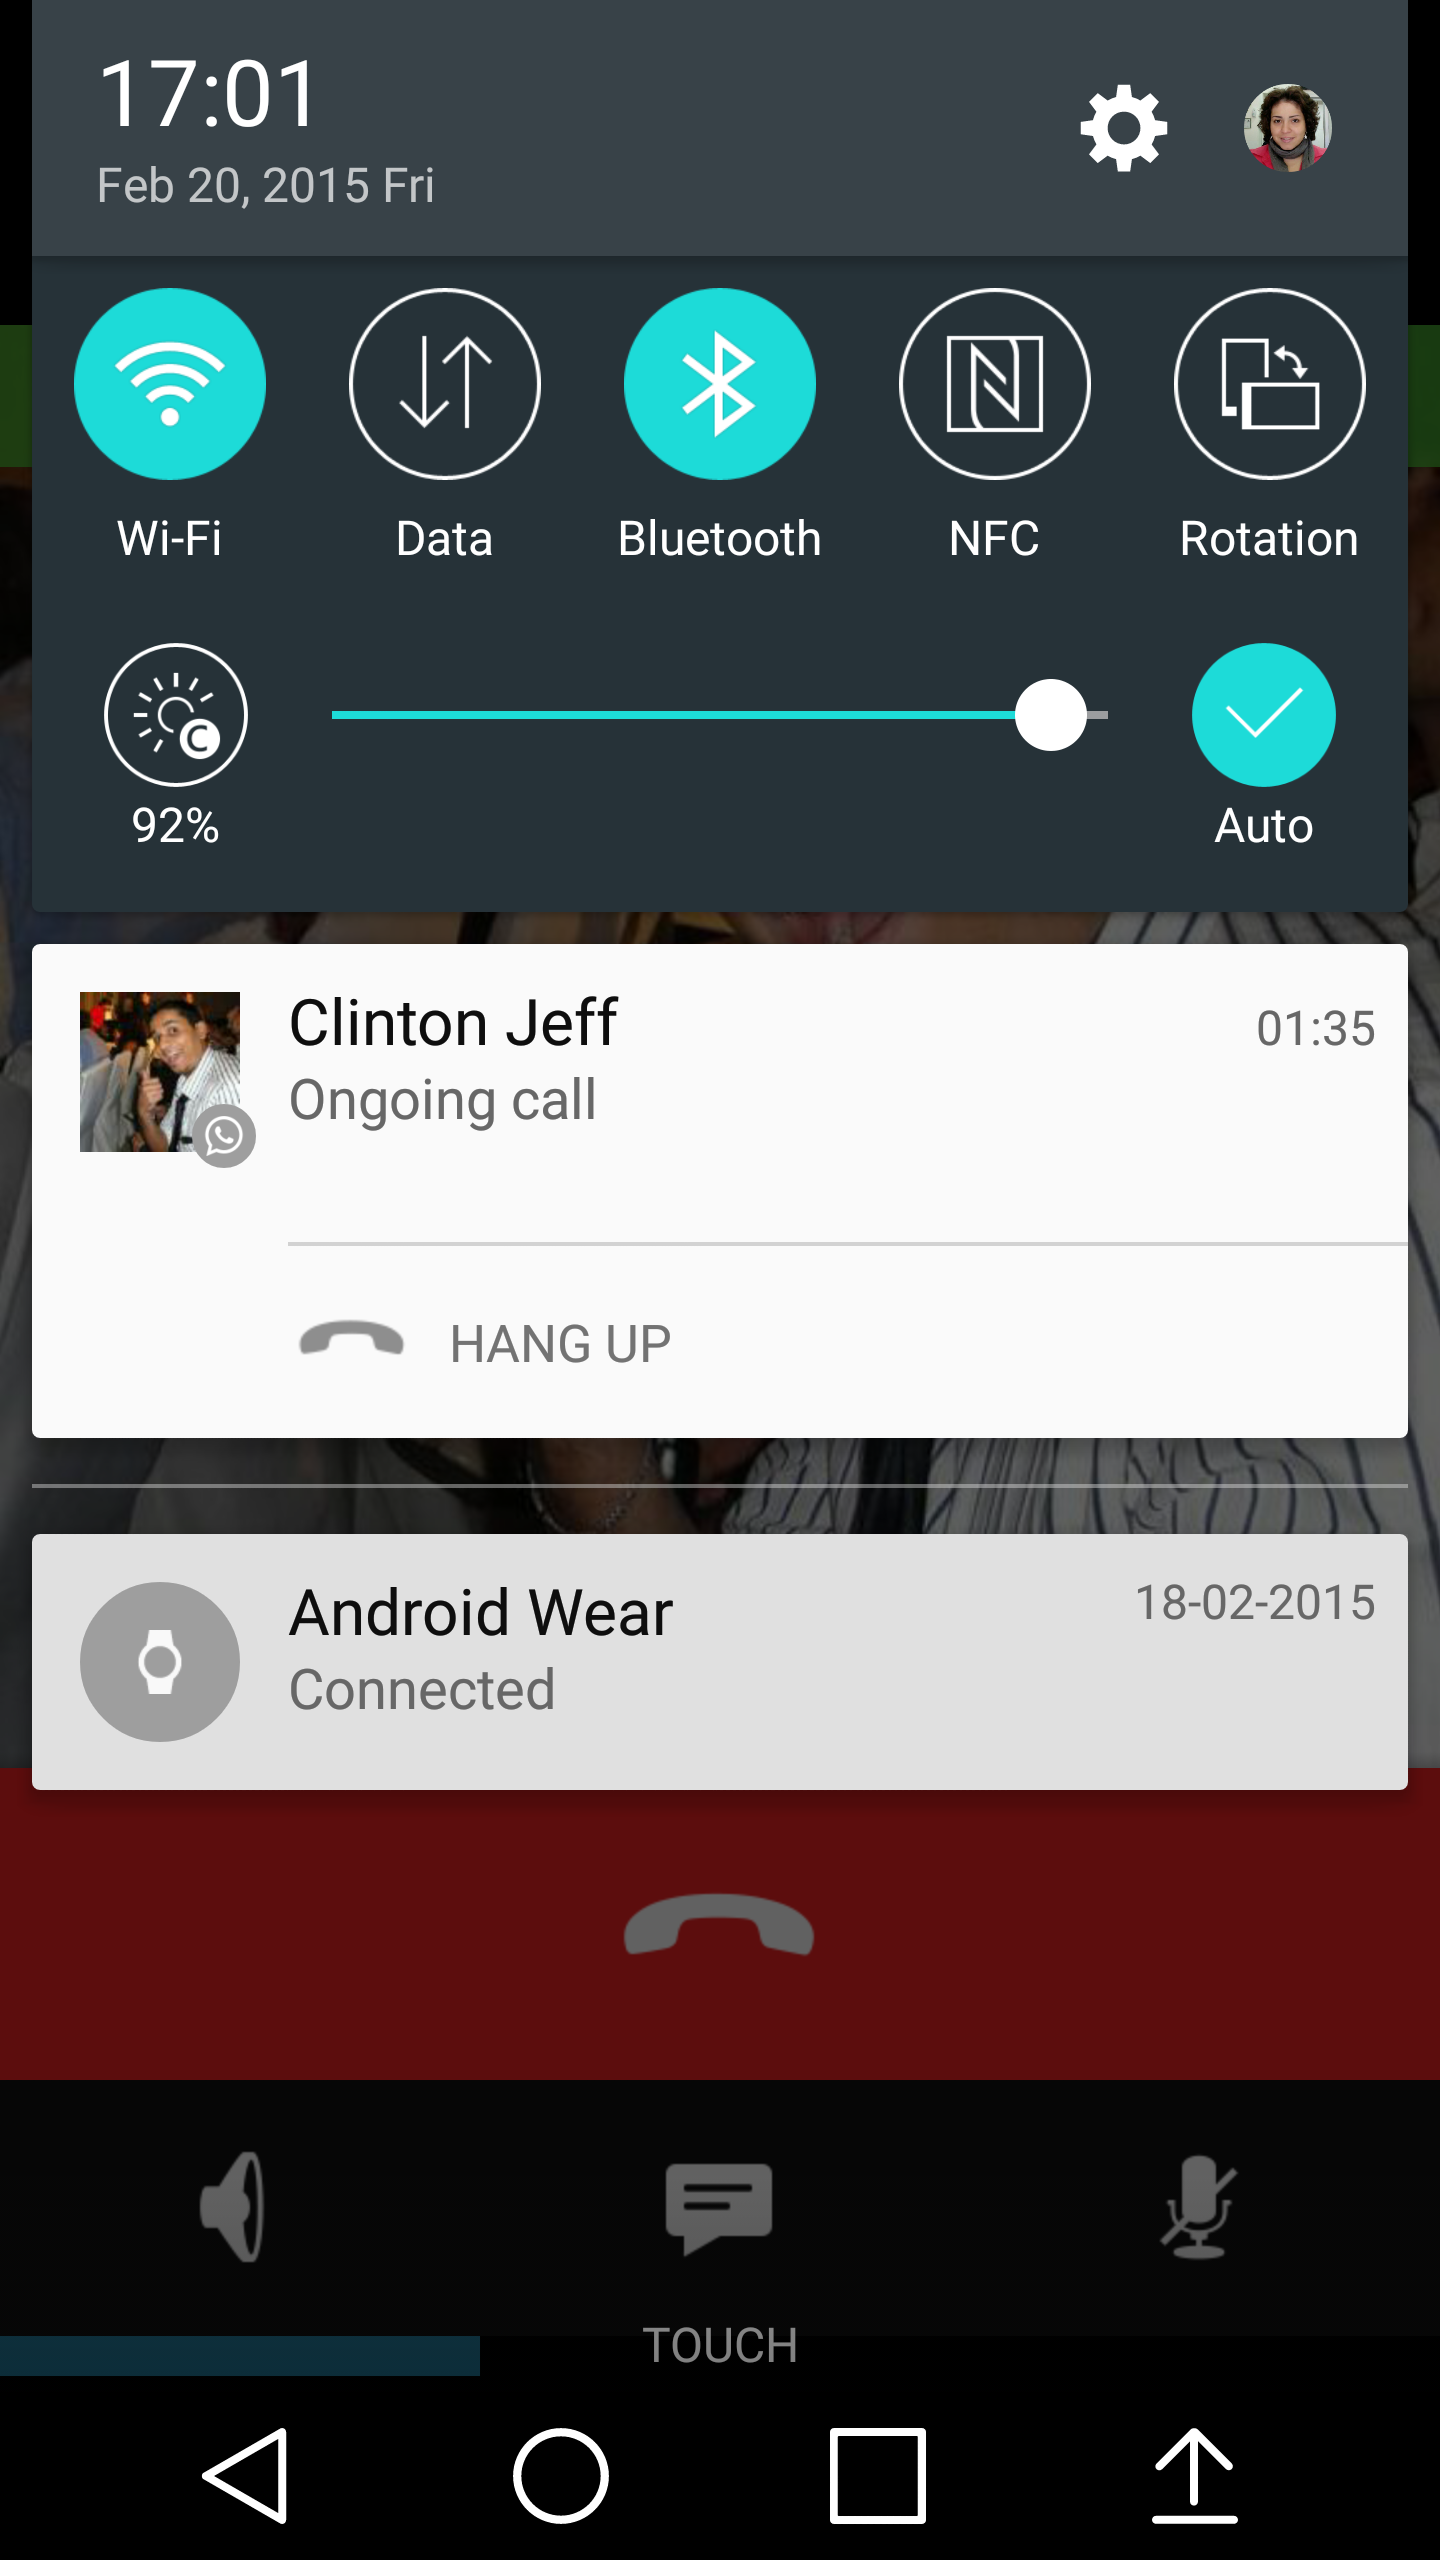
A few users have emailed us reporting getting the function activated over the past hours, and I just got mine up and running after receiving a call from Clinton (who got it from another friend, and so on). So as you are suspecting, the "invite" or, more accurately, the trigger that enables the feature has to be the reception of a call from someone who already has it. (Or maybe this terminal trick still works, I'm not sure.) Once that happens, WhatsApp's UI switches (either immediately or after you exit and reopen the app) from just showing chats, to a 3-tab layout with calls, chats, and contacts.
Calls are well integrated in WhatsApp. The dedicated tab shows incoming, outgoing, and missed calls with precise timing. Ongoing calls stay in the notification panel until you hang up while missed calls leave a notification that you can later check out. While on a call, you can activate the loudspeaker or mute the microphone. If you open your text chats with any contact, a call button appears in the action bar, right next to the attach icon and the menu, to make it easier to talk to them. And finally, if you click a contact's avatar, you now get a bigger profile image with the options to message or call them, or view their information.
whatsapp-calling-4 whatsapp-calling-2
The call button for all contacts now defaults to a WhatsApp call instead of going through your phone. I can't find a way to trigger a regular network call from the app, which is a bit annoying because you might be in a spotty area or your contact might be offline. (For the record, in this case, the WhatsApp call still rings for a while, no one answers, and then gets disconnected. When the person goes back online, they see it as a missed call.) You'll have to go to your regular Phone app to initiate a network call.
When you're lucky enough to receive a WhatsApp call from a friend, you can go on enabling the feature by calling your other contacts. If they're running an older version of the app that doesn't support it, you will instantly see a message notifying you of that so you can tell them to update their app before you call them. Now all you have to do is cross your fingers and hope that someone shares the riches with you so you can spread them further.
I'll leave you with the truthful words of CJ (whose face is all over my screenshots) that perfectly describe this feeling: "I feel so powerful now. What do I do with all this POWAAAAAAAH? *Calls random people in friends' list* With every person I activate, I get less powerful, gasp."
Invite window is closed again
It seems that WhatsApp has closed the invite window again. If you were lucky enough to receive a call and get the option activated, you can still make calls to all your contacts. However, you will not activate the option for them. Since the invite system was working for almost an entire day, we assumed it was open for good this time, but it seems that WhatsApp is still keeping a tight grip on this feature.
Invite window is open now
WhatsApp has opened the invite window again. The feature should activate if you get a call from a friend, but it's a bit hit-and-miss. Odds are in your favor if you have the latest WhatsApp 2.11.552. We're not sure how long the window will stay open so act fast if you need an invite. And please do NOT post your phone numbers publicly here, we will remove them immediately.
And closed again
It was bound to happen, the invite window is closed again.
Invite window is re-opened
We're having fun with this, aren't we? Invites have been going through over the past few hours, we've been told as much by several users. Grab WhatsApp 2.11.561 and try to get called by someone who has the option enabled. We don't know how long this will last for.
WhatsApp Messenger
24,128,754 ratings
Offers in-app purchases
by WhatsApp Inc.
1,000,000,000 - 5,000,000,000 downloads
Appears in a list of Only great apps
    Read more ...
    Designed By Blogger Templates